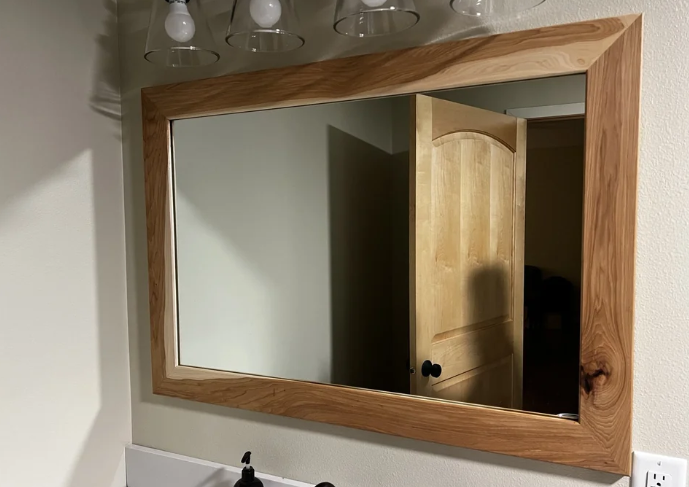
Tired of staring at your boring builder-grade bathroom mirror? These frameless mirrors are found in many homes, condominiums, and apartments since they are a low-cost and straightforward installation choice for the builder.
Large bathroom framed mirrors are expensive, but in this post, we will tell you how to DIY framed mirrors on a budget.. We show you how to upgrade your frameless mirror for a fraction of the price of a new one.
Why Do You Need This DIY Guide?
- It is inexpensive and won’t put a hole in your pocket. This DIY gives a personalized look at a fraction of the price.
- You can make a big difference with a bare frame and little effort.
- This project is doable even for complete DIY newbies if you have essential equipment.
- It will help to easily upgrade old builder-grade mirrors.
- Allows you to match your existing décor – paint or polish the frame to meet your taste.
- It provides a sense of accomplishment. You will be proud of yourself for accomplishing a visible enhancement!
- It is less waste than replacing the entire mirror and a greener alternative than discarding the original.
- It can be completed in a single day or for a weekend instead of a lengthy restoration.
- Allows for creative frame design while keeping it basic or go strong with frame design.
- Gives the bathroom a quick makeover.
Level Of Skill Required To Make A DIY Framed Mirror
This project requires using power tools and knowing how they work. It also needs accurate measurements. If you need clarification on these elements, consider obtaining guidance from an expert. This assignment is a 5 on a scale of 1-10, with 1 being the simplest and 10 being the most difficult.
Time Required
In terms of time commitment, making and installing this DIY mirror frame takes around 3 hours of active effort.
Please remember that this timeline does not include the time spent shopping for supplies and waiting for the paint to dry.
Budget Required For DIY Bathroom Mirror Frame
We had all the necessary equipment and utilized leftover paint from another project.
- Wood Glue – $3.68 Trim – $41.16
- Painter’s putty costs $9.48.
- Caulk – $3.58
- $57.90 (plus tax) total
Materials Required For Building A DIY Framed Mirror
- Home Depot 1/2 in x 3 in x 8 ft Primed MDF Board
- PVC Lattice Moulding 5/32 in x 1-1/8 in x 8 ft (2) 8 feet x 1/2 in x 13/32 in Molding of Composite Beads
- 200pcs 25mm Unfinished Split Natural Wood Beads Half Wooden Balls
- DAP Mirror Adhesive Paint (I used Iron Ore by SW, color matched at Lowe’s)
- Optional: Spray Paint Paintable Caulk Wood Filler
Tools Required For Mirror Frame DIY
- Miter Saw
- Rubber Mallet
- Caulk Gun
- Measuring Tape Level
- Pencil
- Clamps
Also Read: Bar Ideas with Cabinets and Center Shelves with Antique Mirror Glass
How To Build A DIY Framed Mirror
Step 1. Purchasing The Items
- Deciding Frame Thickness. To frame the mirror, you can use 1/2′′3′′ mdf planks. To frame out the beads on top of the MDF boards, use 5/32 x 1-1/8 PVC lattice molding and 1/2 x 13/32 composite bead molding.
- Overlap. The boards should overlap the mirror’s edges by 1 inch on both sides, so estimate the lengths of wood you’ll need appropriately.
- Paint. Choose your favorite paint color.
- Adhesive for mirrors. Purchase a construction glue meant to adhere items to mirrors or glass. Otherwise, the adhesive may not adhere your wood frame to the mirror.
- Cut wood in half. These may be found at a craft store or ordered online. Most people pick 25 mm (1′′) as it is easy to measure.
Step 2 Wood Cut List
Tools. Use your miter, circular, or hand saw with a miter box, or have the boards cut at Home Depot.
Step 3 Glue Molding Together
- After cutting each board to size, we recommend deferring cutting the angles until the parts are glued together. Then, attach the PVC Lattice Moulding flush to the inner border of each MDF board, applying DAP. Use glue around 12 inches at a time (this glue dries rapidly, so don’t bond the entire board at once) and clamps to hold it in place because it will be somewhat bent.
- Next, use the half wooden balls as spacers while you glue down the 1/2 x 13/32′′ Bead Moulding. This piece should not require clamping but just glue around 12′′ at a time.
- Once all the parts are glued and dry, remove the half wooden balls you used as spacers and cut the angles for each corner of the boards.
- Each board must be cut at a 45-degree angle with non-parallel cuts, similar to a picture frame.
- As seen below, the smaller end of the angel should be trimmed toward the flat board and the longer end toward the bead molding. (If molding pieces break apart, just glue them back together and hold them in place for at least 30 seconds to cure.)
- Finally, glue and put each half of the wooden ball.
- Be sure to overhang a bead on the frame’s edges to match the other frame piece and cover both edge pieces.
- Then, slowly start by putting a bead of glue on each bead and placing them one at a time, but quickly discovered that doing approximately 4-5 inches of a squiggly line of glue and swiftly placing each bead directly next to each other was much faster and more efficient. (Some beads may be tight; simply hammer it into place with a rubber mallet.)
Also Read: Chic Ways to Accessorize and Style Your Home This Fall
Step 4 Paint The Frame
- We recommend using a paint sprayer, which you can rent from Home Depot.
- Thin your paint according to the manufacturer’s instructions (you only require 2 tablespoons of water blended into 2 cups of paint).
- Paint with long, rapid strokes, overlapping the frame’s ends. You must approach the beads from various angles to get between them.
- Allow enough time between coats to dry; otherwise, paint drips will develop (which may be brushed away with a foam brush if this happens).
- Make careful to paint all sides of the frame, including the bottom (which only requires a short coat), as the frame’s reflection will be visible.
Step 5 Install The Wood Frame
You’ll need a level, a caulk gun, mirror glue, wood frame pieces, and painter’s tape.
- After the paint has dried, you may attach the wood frame to your mirror.
- Dry fit the bottom piece of your mirror frame with a 1-inch overlap on the bottom and sides if feasible (ours has no overhang on the bottom since the mirror hits our countertop).
- The idea is to conceal the unfinished mirror’s edges without the need for extra trim.
- Place the piece of wood on a nearby surface, face down. To the back of the bottom wood piece, apply a wavy or zigzag bead of mirror glue. Avoid using glue on the inner 1′′ of the inside frame since it will be seen in the mirror’s reflection.
- Place the bottom wood piece on the mirror with a 1-inch overhang (or flush with the countertop, as we did).
- Use a lot of painter’s tape to hold the item in place.
- Repeat for each side of the wood frame piece before moving on to the top wood frame piece. There is no such thing as too much tape. These boards must not fall off the mirror.
- Allow 48 hours for the glue to dry and cure before removing the painter’s tape.
Step 6. Caulk And Putty As Needed For Your Mirror Frame
- Remove the tape 48 hours later.
- Caulk the joint where the corner edges meet.
- Allow for drying time after filling any uneven edges with wood.
- Sand and clean the wood filler.
- Paint and marvel at the caulk and putty’s enchantment!
Final Thoughts
We hope this DIY article taught you how to frame a builder-grade bathroom mirror to give your bathroom instant character and equity.
Adding a frame to a builder’s standard bathroom mirror is a simple and low-cost solution to modernizing it without having to remove or replace it.
This project can be accomplished in a single weekend and is incredibly cost-effective!!


